miércoles, 8 de enero de 2014

Make NGINX send PHP scripts through UNIX socket

I proved this working on both Fedora 19 and 20 as that of today.

After following this great tutorial by falko I got my web server with MySQL (MariaDB) and PHP support up and running in just a few minutes, then I remembered that making PHP listen on a UNIX socket rather than the traditional TCP port could hel you save a few bytes of overhead, which is specially helpful on very busy sites, and speeds things a bit up on very low resource computers.

However, they don't specify how to do so on the above mentioned tutorial, which is why I googled a little and found another tutorial (for CentOS this time, again by falko) which mentions how to do so, and its rather simple:

1.- After having everything installed, open the /etc/php-fpm.d/www.conf file (with root privileges) and look for the listen option.

2.- Change (or comment it) and set it to the unix socket you want to use, for example: /var/run/php5-fpm.sock, you can specify any location you want, but the /var/run/ directory is a pretty common location.


3.- Save it and then open the /etc/nginx/nginx.conf file.

4.- Locate your ~ \.php$ stanza and find the fastcgi_pass option.
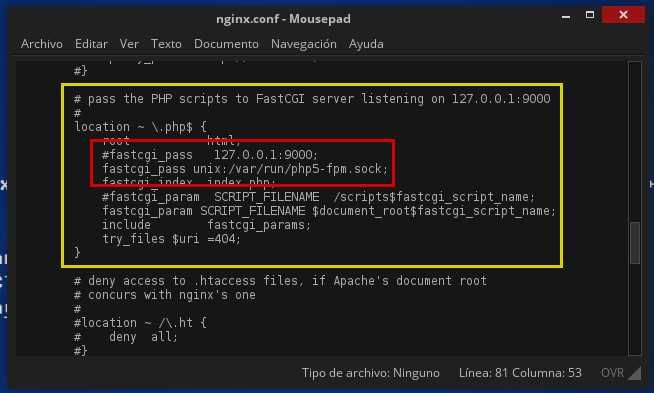


5.- Again, change or comment it and set it to the path of the unix socket you specified before (/var/run/php5-fpm.sock in my case), preceded by the unix: protocol specifier.

6- Now just restart both nginx.service and php-fpm.service by issuing:
systemctl restart php-fpm.service
then
systemctl restart nginx.service
with root privileges of course.

7.- Done! Now PHP listens for scripts through a UNIX socket, avoiding all the TCP overhead.

I know the performance diference is way too little to even be noticeable, but I look at it this way: TCP ports are limited (up to 65535, minus 1024 which are reserved) and UNIX sockets (which are like any other regular files) are just limited by the filesystem you create them in, about 4,000,000,000 or maybe even more on newer systems.

Have a great day ;) and let me now if this helped you someway.

Allow Apache/Lighttpd/Nginx to access content inside an NTFS partition behind SELinux

I stumbled upon this problem because in my dual-boot laptop I keep 3 main partitions:

50 GiB for my linux distro.
50 GiB for my Windows installation.
And all remaining space (about 400 GiB) for files and stuff.

I like to keep it this way for ease of management, in case of trouble I just format → reinstall without having to make an extensive backup, or no backup at all.

As you may assume, all my projects are inside my "stuff" partition (formatted as NTFS, beacuse of windows).

Then I installed my web server with NGINX and MySQL (MariaDB) and PHP support (thanks to http://www.howtoforge.com/installing-nginx-with-php5-and-php-fpm-and-mysql-support-lemp-on-fedora-19).

With previous installations of Fedora, I used to completely disable selinux, but this time I tried to do things the right way, keeping it enabled; for ease of development I also used to place links inside the html/ directory (where all the web stuff is located) towards the projects I was working in (which were inside my "stuff" partition), but things didn't work this time.

Why? you may ask, well it's because selinux, as the protector it is, didn't let the web server to access anything inside my partition, and since NTFS directories do not support SELinux labels at all, the only 3 ways to go were:
  1. Migrate all my projects inside the html/ folder, thus having to use Geany with root privileges and having to backup them everytime something with my distro went wrong, and with the risk of forgetting to backup them as well (silly me).
  2. Mount the partition with the context option "httpd_sys_content_t" and anything a normal mount needs, by editing the fstab file.
  3. Just telling SELinux that an httpd server can access content inside an NTFS partition (which is accessed via fuse).
Well, the two last ones were the most viable so this is the right procedure to do both:

#1 Mounting the NTFS partition with the "httpd_sys_content_t" context label:

Add the "context=system_u:object_r:httpd_sys_content_t" to the end of the "options" string of the fstab entry of the filesystem you want to use, example:

1.- Open /etc/fstab with the editor of your choice (mine is mousepad) with root privileges, of course:

Opening the /etc/fstab file
2.- Look for the fstab entry of your filesystem:

Locating the "options" string inside fstab

3.- Add "context=system_u:object_r:httpd_sys_content_t" (without quotes) to the end of the "options" string, located at the end of the filesystem entry (just before two numbers), it's a comma separated list:

Adding the "context" option with the "httpd_sys_content_t" parameter

4.- Save and reboot, or you can unmount → mount the partition again, it's now mounted with the new options.

#2 Telling SELinux to let web servers access another partitions

1.- Open a console and issue this command:
setsebool -P httpd_use_fusefs 1
2.- Done! Now any websever can access content inside any mounted partition via fuse, dont forget to add the -P option to make it persistent across reboots, otherwise SELinux will block access again.

You can always disable these two settings by either removing the option string from the fstab file or issuing the same command with a 0 instead.

Remember that SELinux is another layer of security added to your system, and since it's safe to disable it, it could save you someday, you never know.

Have a great day! ;)

Compress PSP ISOs to CSOs with cisoplus on Linux

There are many GUIs to do this for Windows out there (YACC, for example, is an excellent tool - http://yacc.pspgen.com/), but for Linux and other NIX environments we only find command line applications and source packages of GUIs to compile - along with the dependencies they need.

This a very simple script for the shell that compresses an ISO (using cisoplus/cisoplus_O3) to a CSO, with the maximum level of compression and threshold, it also removes the update modules and other unnecesary things.

What's better is that you may specify a list of files (through the console) and it will compress any one of them individually, with the same settings; and just mark the file as an executable (chmod +x) and you can even drag/drop files on the script to compress them, it's as simple as that.

Inside the zip you'll find with the script and the original cisoplus executables (by kapoue3).

You can also make it easier to use by dropping the entire contents of the package into /usr/share/bin or any executable path your system uses, and deleting the ".sh" from the script name.

The script runs cisoplus_O3 (it's the same as cisoplus, except that it was compiled with a level 3 optimization) with the following syntax:
cisoplus_O3 -com -opt -rm_update -l9 -t99

Instructions:

1.- You can specify the filename of the ISO to compress...


1.a.- Alternatively, you can drag/drop the ISO onto the script.


2.- A temporary file will be created while the file is being compressed (to avoid confusion, and to let you know the compression isn't done yet).


3.- The resulting file will have the same name as the original ISO.


Download link (hosted at my Google Drive :)

cisomax.tar.gz

Hope everyone finds this useful ;)